Saturday, August 19, 2006

Born On The Same Birthday Compatibility

SITE - Change URL for the RSS

The RSS feed of this blog URL changes. The new address is: http://feeds.feedburner.com/DominoWeb20 . In fact I just signed on FeedBurner which not only ensure better compatibility with the aggregators (unlike the previous atom feed) but also to track the statistics of access to the site via this medium. As has just to remark on Julien domlike.net , the majority of access to a blog is through the aggregators and not from a web browser. Former

Atom feed will still be active a few weeks. Feel free to leave a comment if something goes wrong.

[update] I also took the opportunity to offer the ability to view RSS feeds of the site in PDF format and via Mobile xFruits . This site allows you to transform and to aggregate RSS feeds into different formats. In addition, the interface is simple, fluid and visually pleasing. In short, an essential tool that I recommend.

Thursday, August 17, 2006

Broken Capillariesalcohol

TIP - Keep an open session Domino

One issue that bothers me the most with web-based application is the end of session. Still this morning Users called me panicked because when saving her paper, patiently prepared for an internal company blog, the Domino server replied that the session had expired. In

travel the excellent blog by William Beh " Lotus Notes on Web 2.0 " I finally found a simple and quick to implement. It proposes simply to call Ajax file server periodically with the class PeriodicalExecuter prototype.js. This keeps the session open Domino.

This method is not perfect from a security standpoint. The user must close the browser to close the session. The coutournement this problem will be the opportunity to write a new article.

Wednesday, August 16, 2006

Simple Lease Agreement Printable

INFO - New

version of scriptaculous 1.6.2 has been released. It fixes a number (or a certain number) of various bugs. 1.5.0 RC0 version of prototype.js is also provided in the new installation package that you can download from the downloads page .

reminder, scriptaculous library is regularly presented in this blog. It is very convenient to manage the notament drag & drop and the autocompletion . Some examples are available online on the website schedule Domino & Web 2.0: Examples

prototype.js library is being used in many bilbiothèques as scriptaculous javascript but Rico or moo.fx which were also presented here (and LiveGrid accordion for Rico Smooth Slideshow for moo.fx).

Minute Maid Heartwise Where To Buy

version of scriptaculous AJAX - Pictures

Back from a long weekend of August 15, it is time to expose the souvenir photos. The goal is not to present a photo management application but rather to present two solutions that I find aesthetic AJAX and very easy to integrate with Lotus Domino. The first solution presented in this article presents the photos as a banner with fade transition effect and the possibility of adding a title, description and a link. The second solution will be presented in the next section. She can open the photos from thumbnails as a modal dialog box. This effect is particularly used on zoomr .


Smooth Slideshow by Jonathan Schemoul

The library's Smooth SlideShow JonDesign quickly create a banner with fade effect as found many already in Flash. This Library based on prototype.js and moo.fx. The whole weighs 21.6 kb which seems very reasonable especially if one uses these libraries for other uses on the site. For comparison, dewslider.swf an excellent equivalent in flash weighs 30.4 kb. However, knew nothing about Flash, I would not dare to advance arguments for or against any of these solutions. The choice of this library is primarily motivated by the primary goal of this blog, presenting solutions for Lotus Domino AJAX.


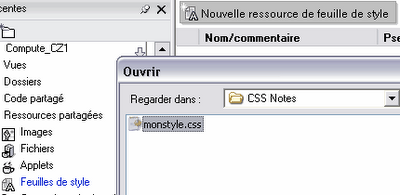
library installation

To use bilbiothèque must first download the package available on the introductory page of the library. Once the file is decompressed, add the javascript files and stylesheets in the shared resources of the Lotus Notes database. Files to add are:

  • moo.fx.js
  • moo.fx.pack.js
  • protoype.lite.js
  • showcase.slideshow.js
  • timed.slideshow.js
  • jd.slideshow. css

If you already use prototype.js, needless to add prototype.lite.js.


Using the driver DLL

As described in the documentation, you must declare

  1. and javascript libraries stylesheet
  2. report images to present
  3. customize the size of the display area
  4. define the display area on the page

statement to present images is done through an array declared javascript form:

  mySlideData [countArticle + +] = new Array (
'image1.jpg',
'article1.html'
'Item 1 Title',
'Item 1 Description'
)

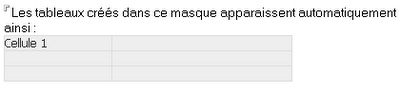
Integration with Lotus Notes

To facilitate the updating of files, I would pass by a mask for managing photos display. This mask is defined with the following fields:

  • Title: free text field
  • Link: Free text field
  • Description: Free text field
  • Photo: rich text field

Once the mask created, it remains to define a view "Photos". To facilitate my task, to present the JavaScript code directly to integrate into my page. The column formula is:

  "mySlideData [countArticle + +] = new Array (" 
+ "0 /" + @ Text (@ DocumentUniqueID) + "/ $ file /"
+ @ Subset (@ AttachmentNames; 1) + "', "
+ Link +" ', "
+ Title +"' "+ description +
"');"

Do not forget to sort the first column in order to be able to extract data with @ DbColumn.

To create my web page, I'll go through a Notes page, but can also integrate it into a mask.

As content as HTML must integrate javascript libraries, add an event onload to launch the band to open the page and then set to display images from the views previously created and then set the options to define style headband size, either:

  Photos: Photos ("":"";"";" DbColumn = @ "1); 
@ If (@ IsError (val);";
"\u0026lt;script src = \\ "prototype.lite.js \\" type = \\ "text / javascript \\"> \u0026lt;/ script>
\u0026lt;script src = \\ "moo.fx.js \\" type = \\ "text / javascript \\" > \u0026lt;/ script> \u0026lt;script
src=\\"moo.fx.pack.js\\" type=\\"text/javascript\\"> \u0026lt;/ script>
\u0026lt;script src = \\ "timed. slideshow.js \\ "type = \\" text / javascript \\ "> \u0026lt;/ script>
\u0026lt;link rel = \\ "stylesheet \\" href = \\ "jd.slideshow.css \\"
type = 'text / css \\ "media = \\" screenshot \\ "/>

\u0026lt;script type =' text / javascript \\ ">
function addLoadEvent (func) {
was oldonload = window.onload;
if (typeof window.onload! = 'function') {window.onload = func
;} else {

window.onload = function () {
oldonload ();
func ();
}
}
}
function start slideshow () {
initSlideShow ($ ('MySlideShow'), mySlideData);
}

countArticle = 0;
was mySlideData = new Array (); "
+ @ Implode (Photos) +
"addLoadEvent (startSlideshow) \u0026lt;/ script>
\u0026lt;style>
# mySlideshow
{width: 400px! Important;
height: 200px! Important;}

\u0026lt;/ style>" )

It only remains to indicate where on the page displaying the banner by adding HTML as text relay:

  \u0026lt;div id="mySlideshow"> \u0026lt;/ div>  

It's over, here is a sample output with some photos Gulf of Morbihan.

Tuesday, August 8, 2006

How Did My Nose Get Crooked?

TIP - TIP

I discovered recently that one could apply the CSS on the client Lotus Notes 6. Yet it was written to help, but I did not even dare to imagine that this was possible. Please note, however, there are very strong limitations. For the moment we can not apply a CSS style that some elements, more classes and style seem not to be managed on the client.

An application that can possibly be interesting is the customization of tables created in a rich text field.

To apply a style to a mask, you must first create a style sheet in a file text in notepad or another text editor (I use PSPad ). The style sheet may for example look like:
  
TD {border: 1px solid # ddd;
background: # eee;
color: # 333;
font-family: tahoma;
font-size: 12px;
}

Once the file is saved, it must be integrated into a Notes database as a resource "stylesheet".


To apply the style sheet in a mask:
  • Open mask
  • Select the menu "Create \\ Resource \\ Insert Resource"
  • Select "Style Sheet" as resource type
  • Select the file and then click OK
A (e) icon symbolizing the resource should appear in the Notes form.

It remains only to save the mask is finished. When a user creates a new table in a rich text field of this mask, this table will appear with the options defined style.


can also apply a style to the IMG tag to automatically add a border around images iportées or glued. The stylesheet may be:
  
IMG {padding: 5px;
border: 4px solid # 373;}

The possibilities seem too limited to be really interresting to exploit. We should see if the support for CSS changes with future versions of Notes.

Monday, August 7, 2006

Denisse Milani Look Alike

CSS Notes - Forcing properties formatting text in a rich text field on the Web

Nothing worse than a website where the cast of characters differ from one page to another. If it is possible to control a graphic for a site-oriented public, it is much more difficult or impossible to impose it for the important internal document databases. In defense of users, Lotus Notes preserves text properties in the copy / paste from the Office applications or from web pages.

Fortunately, the Domino Web engine conversion is not always clean. It still uses the "old" HTML tags, especially the \u0026lt;font> to define the font and size. To control the rendering of rich text field on the Web, there is enough to redefine the style of this tag. Thus we can for example add in the header of the web page:
  \u0026lt;style> 

font {font-family: tahoma, arial, helvetica, sans-serif;
font-size: 1em;}

\u0026lt; / style>

Whatever the font used and whatever its size defined in Notes, the field content will always appear in tahoma font size 1em. The user can cons by bold or underline the characters to add some effects to the content.

course we can also surround the rich text box of a div with a class defined to limit the scope of the effect in this field. We will then have the mask:
  \u0026lt;div class="mybody"> 

rich text field \u0026lt;/ div>
and for the definition of style:
  \u0026lt;style> 
# mybody are
{font-family: georgia, "Times New Roman ", Times Roman, serif;
font-size: 12px;}

\u0026lt;/ style>

Face Turns Red After Eating

GRAPHICS - Improved graphics Excel

It's summer, it's nice and warm. I'll take the month of August, not to pause, but to address topics that some may find it futile. I start with the graphics related to Web 2.0. Each decades come new graphics mode: square corners, rounded corners , drop shadows, etc ... With the Web 2.0 (and Apple) came the reflection effect.

month of August is the month the least loaded of the year, I still enjoying this time to review my documentation and presentations that I made to diffuse. I therefore take this opportunity to see how to improve the rendering of graphics generated by Excel. Even if the most important is the content, the listener is always aware if the display is nice.

STEP 1: Preparation of the chart in Microsoft Excel (or OpenOffice Calc with)
I'm not going to give courses of Excel is very limited in this area. The only recommendations I give is to not worry about colors because they can be modified in Adobe Photoshop, but be very careful to remove the borders of graphs.
Once the chart ready, remove the caption and enlarge the chart as closely as possible the memory you have on your computer. The expansion of the graph will remove the effect of "stairs". Copy and paste the chart as new image in your graphics editor. I would use Adobe Photoshop but it must also be able to work with Paint Shop Pro or Gimp.

STEP 2: Preparation of the graphic as the graphics editor
I start by changing the colors of my chart. Photoshop gives me much more possibilities than the limited palette of Excel. I cancel apply gradients on the charts which burdened a bit too much for my taste.
To colorize my chart, I use the "magic wand" to select the area to be colorized and pot peiture to apply the new color.

STEP 3: Prepare the work area
Before resizing the image, I delete the extra white area around the chart using the crop tool. It is now possible to resize the image to the desired size. To resize the image in photoshop you should select the menu option "Image \\ Image Size" and specify the width and / or height. I use the magic wand again to select background bland and I delete. It does more than keep the chart and eventually scale in the case of bar charts.

The effect of reflection should be displayed in the chart so you must increase the work area. With Photoshop you have to select the menu option "Image \\ Size of the work area. In the configuration box I specify a height twice as large as that proposed and clicks on the top box to tell it to enlarge the area down.

STEP 4: Application of the reflection effect
Since the zone layer, right click on the layer of the chart and then select "duplicate layer".
Select create a new layer then select the menu "Edit \\ Transform \\ Flip Vertical". Move the graph then returned in the other graph.

Select the "Mask" layer on the back of the chart in the display box layers.

Select the Gradient tool by specifying type as black to transparent gradient.

Apply gradient on the graph reversed from the middle of the graph up the chart.

You should get a result like this:

It remains only to adjust the opacity of the reflection layer by lowering it to 15% for example and then applying a new layer on the bottom if necessary.


This method can of course be applied to any type of image and text, not just Excel charts.